Getting into FLDigi contesting - a quick A-Z tutorial

This time during my amateur radio adventures, I wanted to try out the "old" "legacy" digital modes, such as PSK, RTTY, OLIVIA, HELL and so on.
Unfortunately, there is not much activity anymore - my best chance would be at a contest. Fair enough I thought, let's google on how to setup fldigi for a contest then. After a quick sobering-up I realized there seems to be no nice tutorial on how to do that.
So I realized I needed to find out myself and publish it after I get confident enough someone can and should replicate my setup.
If you want to use FLDigi only as a modem and use another Log such as N1MM as a log and message generator, you can skip this blog post. This one will only cover ONLY using FLDigi.
Setting up FLDigi
Contest mode, Logging, Makro panels
Step 1: Install and open FLDigi
This step should be easy. Go online, google "Fldigi download", do just that and install the program with its recommended settings. After that, run it and provide your station information.
Step 2: Set FLDigi to contest mode
Open up FLDigis config dialogue like this:
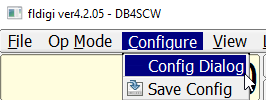
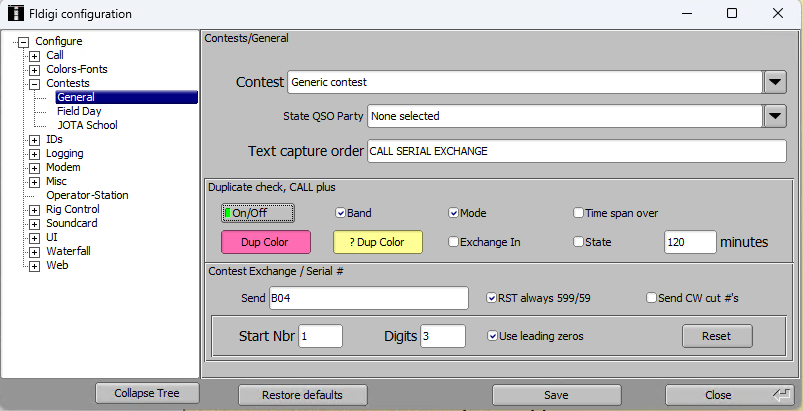
Navigate to "Contests" -> "General" in the config tree on the left side. For some contests, FLDigi provides templates, but for most contests, choose "Generic contest" in the contest selector. If your contest needs an exchange in addition to a serial number, add this in the "Contest Exchange" textbox. Also adjust the text capture order (add or remove "SERIAL" and "EXCHANGE" depending on what you need). Hit the "Reset" button to set the new serial number. Hit save for good measure.
This example assumes a contest exchange of 599 + Serial Number + DOK
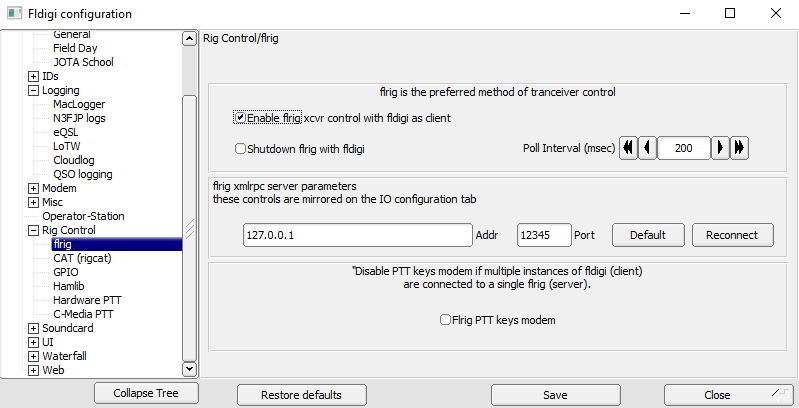
After that, go to Rig Control and provide rig control information. For my setup, I activated FLRig, as I already use that software for other modes such as FT8.
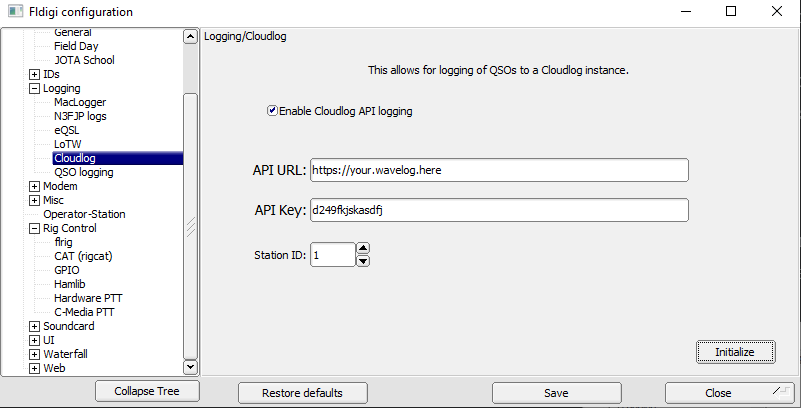
Optional: If you use Wavelog as a log (which you should, it is awesome) and want to log immediately (which during a contest I DISCOURAGE), go to "Logging" and "Cloudlog". Don't be discouraged about the naming here - wavelog and cloudlog use the same logging API.
Here, enable the API, provide the url to your wavelog instance, as well as a read/write-API key with access to whatever station id you want to log to. After that, click "initialize". If the button turns green, you are good to go. Hit "save" again, then "close".
IMPORTANT: please remove any trailing slashes from the API url.
"https://your.wavelog.here" works, "https://your.wavelog.here/" will fail!
Step 3: Change logging
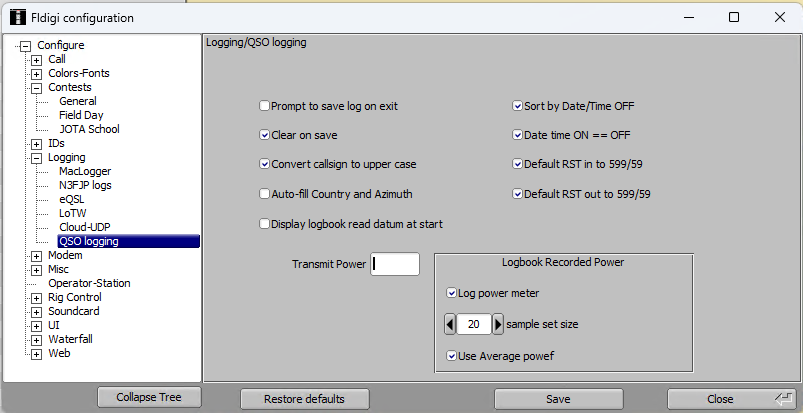
Go to Logging -> QSO Logging and change the switches to your liking. I recommend enabling "Clear on save", so that all data vanishes from the input fields when you log a QSO.
Step 4: see the changes in the FLDigi UI
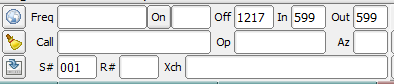
First thing you'll see the fields for serial numbers (Sent and Received), as well as the received exchange.
Step 5: Moooore Macros!
Now we need more space for macros than FLDigi provides. For this, go to "View" and enable all the macro slots.
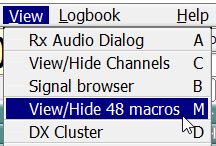
This will enable the maximum number of macro slots:

Pre-setting your exchanges as macros
all the automatation, all the fun!
We now have to prepare our contest exchanges as macros.
Let us assume this would be an optimal contest exchange (between me, DB4SCW of DOK B04 and another callsign, like DL0LOL of DOK MEME26):
DB4SCW: CQ TEST DB4SCW DB4SCW CQ
DL0LOL: DL0LOL DL0LOL
DB4SCW: DL0LOL 599 012 B04 012 B04 DB4SCW
DL0LOL: DB4SCW 599 033 MEME26 033 MEME26 TU 73 DL0LOL
DB4SCW: DL0LOL TU 73 QRZ de DB4SCW?
Of course, we need macros for the S&P side of this QSO, as well as the "Run" side of the QSO. Also, a few "utility"-macros are highly encouraged.
Step 6: Edit the macros
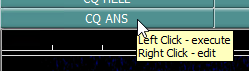
Choose a button (used or unused) and right-click to edit. This opens the macro editor. On the left you see your macro, on the right all placeholder values and functions you can use.
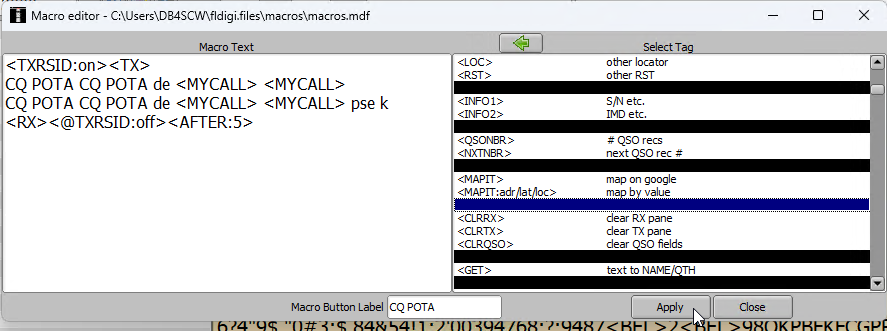
Use the placeholders, functions or fixed text by typing to compose your macro content on the left side. Then choose a macro button label and hit Apply as well as Close.
Repeat for each macro.
I will provide a set of my contest macros (and why you need them) at the bottom of this section (below Step 9).
Step 7: Create a new logbook for your contest
Create a new logbook for your contest so you can seperate out the QSOs you made better:
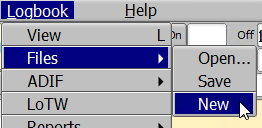
Step 8: setup your audio
Setup your audio next. First, open that config dialog again. This time, set your soundcard:
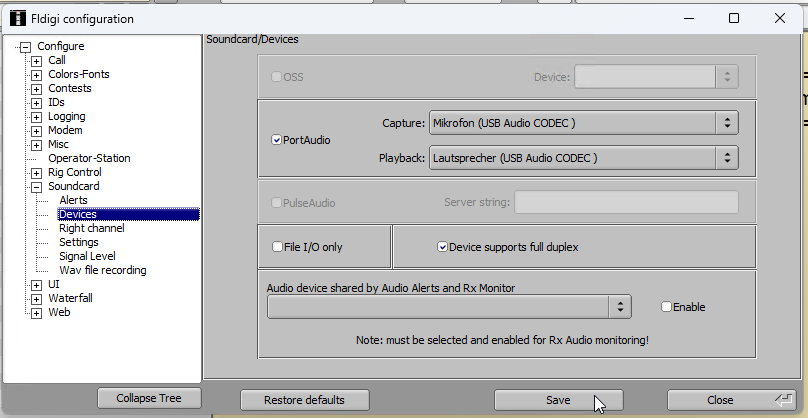
Then, use the buttons on the far bottom right of the window for fine tuning.
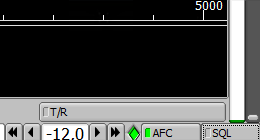
Let's discuss the options from right to left.
SQL: Set squelch. This will reduce the gibberish appearing on your screen on an empty channel when you RX, but will also suppress weak signals. I would set this to off. If you set this to on, use the slider on the very very right to adjust squelch level. The green bar to the left of the slider is the incoming audio levels. Set it ABOVE this audio level on a clear channel.
AFC: This will follow the signal if it drifts. For the most part, you want that. If the band is REALLY crowded and another signal is really really close by, this setting might cause FLDigi to drift over to the other signal. If this is the case, turn it off. I would advise the setting to "on" as default.
Green rhombus: Incoming audio level indicator. This should be green. If it is yellow or red, lower incoming audio levels.
The funny number with the arrows to the left and right: This is your TX audio levels in dB. Run a transmission and lower the value until your AGC is fine (just like you do with WSJT-X).
Step 9: Let's contest!
You are now set to start contesting!
To populate the fields in the logging window, just click on call, serial number and exchange as the data rolls in in the RX window to capture it and set it to the logging window.
To tune, use your VFO and click with your mouse on the waterfall on the bottom of the FLDigi window to select a frequency inside your filter bandwidth.
Come back after you are done!
"Step 10": My macro recommendations (and the reasoning behind them)
Generally, you need <TX> to start transmitting and <RX> to stop transmitting at the beginning and end of every macro, unless it is a macro that should not TX.
Also, these are MY way of doing stuff. Adapt to your own liking!
RUN (calling CQ)
"Run CQ"
<TX>
CQ TEST <MYCALL> <MYCALL> CQ
<RX>
<AFTER:5>
Calls CQ Test. The "After" placeholder loops this until you press Esc after x (in this case 5) seconds.
"Run Ans"
<TX>
<CALL> 599 <SERNO> <XOUT> <SERNO> <XOUT> <MYCALL>
<RX>
Answer whoever answers you. Of course, you have to select the call from the rx window first so it is populated in the logging window.
"Run QRZ Log"
<TX>
<CALL> TU 73 QRZ de <MYCALL>?<LOG><INCR>
<RX>
Thanks your caller and calls QRZ. Also puts that contact in the log via the <LOG> placeholder and also increments the serial number for the next caller. Yes, you have to do that manually via <INCR>.
S&P - Search and Pounce (calling stations that call CQ)
"S&P Ans"
<TX>
<MYCALL> <MYCALL>
<RX>
Answers the station calling CQ using your callsign twice.
"S&P Exch TU"
<TX>
<CALL> 599 <SERNO> <XOUT> <SERNO> <XOUT> TU 73 <MYCALL>
<RX>
Sends your serial and exchange and thanks the station. Does not log yet to wait if CQ calling station needs repeats
"S&P Log"
<LOG><INCR>
This does not TX, but just logs the contact and increments your serial number once you are sure the CQ calling station has moved on from you.
Utility macros
"Agn?"
<TX>
AGN? AGN?
<RX>
A classic. Asking for repeats. Valid for S&P and Run.
"Decr"
<DECR>
Decreases your serial number by one. Good when you need to go back if you logged prematurely.
Exporting your log as ADIF and CBR
for your master log and the contest sponsor
Step 1: Export your log as ADIF for your master log
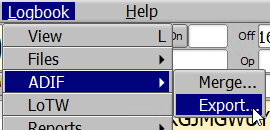
Choose the export option in the menu:
Choose the QSOs to export (since you opened a new logbook it should be as easy as clicking "all") as well as the fields to export. Included in the screenshot is my selection, adapt as needed.
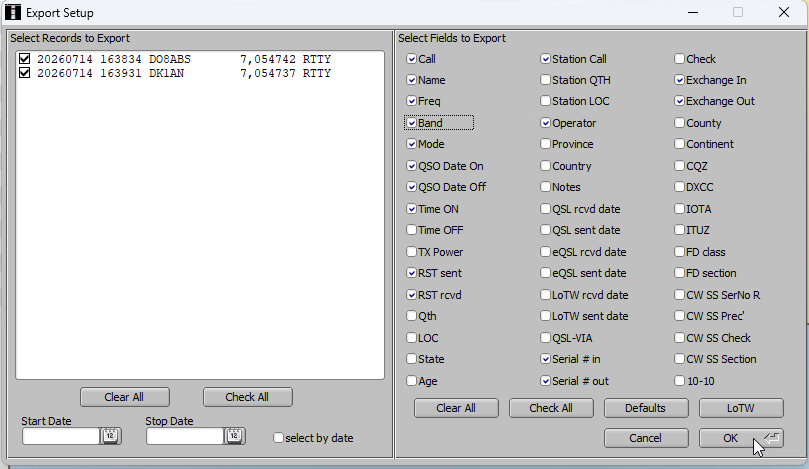
Hit OK and save. Then import it to your master log (hopefully wavelog).
Step 2: Export your log as CBR for the contest sponsor
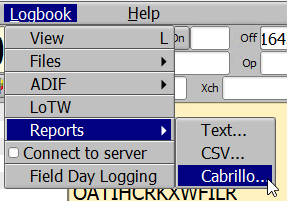
Choose the Cabrillo reports option:
Choose the QSOs again, then choose the contest and what you like to export. Again find my selection in the screenshot, adapt as needed.
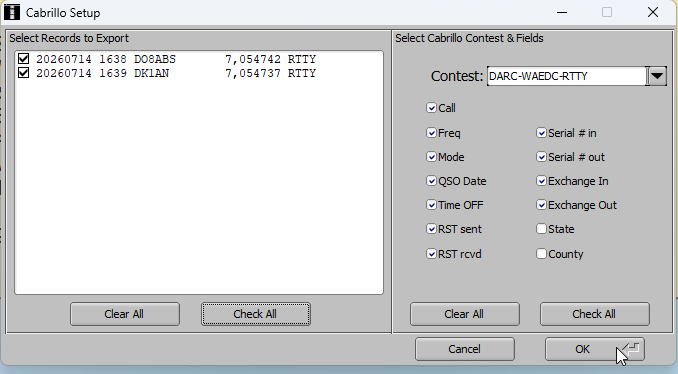
Hit ok, save the file.
Afterwards, open the file in a text editor of your choice and add the header information. Unfortunately, FLDigi does not provide a nice UI for this.
After filling in the blanks, upload it to the sponsor.
Finally, if you use wavelog, run the CBR import.
Final tips and tricks
stuff someone should tell you
Sometimes, people use their software wrong, like using the wrong sideband. This results in a reversed signal. Once you tune to that signal, you can hear it fine, but it will not decode. If this happens, hit the "RV" button to temporarily reverse the decoding for FLDigi. But remember to uncheck after you make contact!

Congratulation!
you did it!
You ran your first Digi contest using FLDigi! I hope to see you on the bands during a digi contest in the future.
Once you master this and want to move on to a more... professional RTTY setup, consider N1MM as a logger, multiple decoders for maximum readability and FSK instead of AFSK. Maybe I'll release another tutorial on this. Hit me up if you want that.
73 de Stefan, DB4SCW