N1MM CAT control using FLRIG

First question: WHY?
Why would you want to do that?
Using flrig to control your radio has benefits: You can just point programs who support flrig to use flrig for CAT control and have flrig handle the connection via COM port to the radio. This also has the benefit that multiple programs can CAT control your radio at the same time (e.g. JS8 and WSJT-X or fldigi), which is not possible using direct CAT control (because a COM port can only be used by one program at the same time).
OK. Great. But you might ask... "N1MM supports my IC7300 out of the box, and I only use N1MM, so why bother?"
That's where the second benefit of flrig comes in if you use more than 1 radio.
You can create config files for each of your radio and desktop links pointing to these config files. This enables you to have a "double tap to load flrig for IC7300" and a "double tap to load flrig for x6100" (for example) on the desktop. No fussing around with configs, changing com ports, speeds, and other things while hooking up another radio.
For all other programs, they only know to use flrig - what radio is hooked up to flrig doesn't bother them.
This is why I went this route - I don't want to fuss around changing N1MM if I'm using my logging laptop at home with the 7300 or on the road portable with my x6100. Just connect the USB, fire up flrig and have N1MM talk to that instead of the radio directly.
I would have preferred if N1MM supported flrig itself, but this is nothing the fine hams of the internet haven't created solutions for.
So... how do you do it then?
Ok ok fine... let's start.
Step 1: Download Hamlib library
Download the latest hamlib library here and install it. It's quite a straight-forward process: https://hamlib.github.io/
Choose the "Current stable release", and the EXE with "w64" on modern computers.
If Windows complains about the installer - as long as you download directly from github, you are safe.
Click yes and next until you are done - the default options in the installer are perfectly fine.
Step 2: Confirm installation
Confirm that there is a folder starting with "hamlib" in your "C:\Program Files" directory now. It should contain a "bin" folder with a few exes inside, one of which should read "rigctlcom.exe".
If that's there - fine! Remember the location and go on to Step 3. If not - fix the installation!
Step 3: Install a virtual COM port driver.
Now we need to create a pair of virtual COM ports. This has to be done in software. There are multiple options for this. I used the first two of the three below listed options. Option 1 is free.
1) com0com (free): https://com0com.sourceforge.net/
2) Free Virtual Serial Ports (free with some functions disabled): https://freevirtualserialports.com/
3) Virtual Serial Port (have not used that one yet) https://www.virtualserialportdriver.com/
If you use com0com, a virtual COM port pair will automatically be created for you if you use the default installer options.
If you use "Free Virtual Serial Ports", you need to open the program after installation and create a "Local Bridge". Follow the wizard. Default options are fine.
After that, go to Windows device manager and write down the COM port numbers of these virtual ports. Lets say they are COM5 and COM6.
Step 4: Configure N1MM to control a Kenwood TS-2000.
Wait... what?
Yeah, I know. Just follow along, I'll explain once we are done.
Go to Config -> Configure Ports, Mode Control...
There, set a TS-2000 radio, baudrate 19200 on one of the virtual COM ports (I chose COM5, does not matter which one, just remember which one you chose for later).
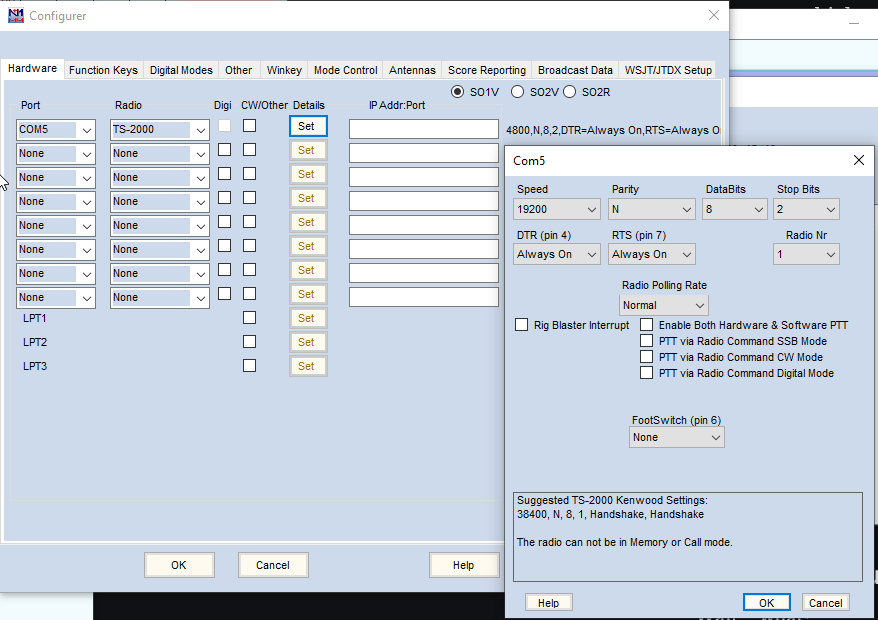
Save everything. N1MM will complain that it can not control the TS-2000. Ignore that and exit N1MM.
Step 5: Create a virtual TS-2000.
Wait - WHAT NOW?
Yeaaaah, I know. Just follow along...
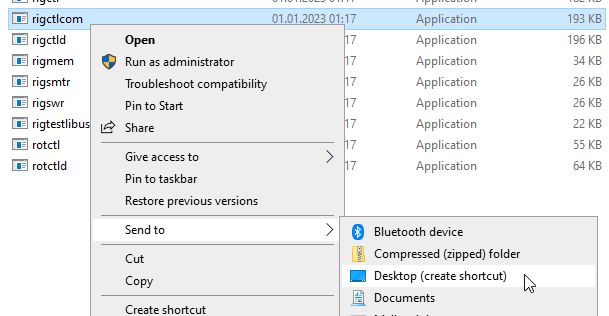
Go to the hamlib folder you checked in Step 2. Right click rigctlcom.exe and save a shortcut to your desktop like so:
Next, go to your desktop, search for that shortcut, right click it and go to properties.
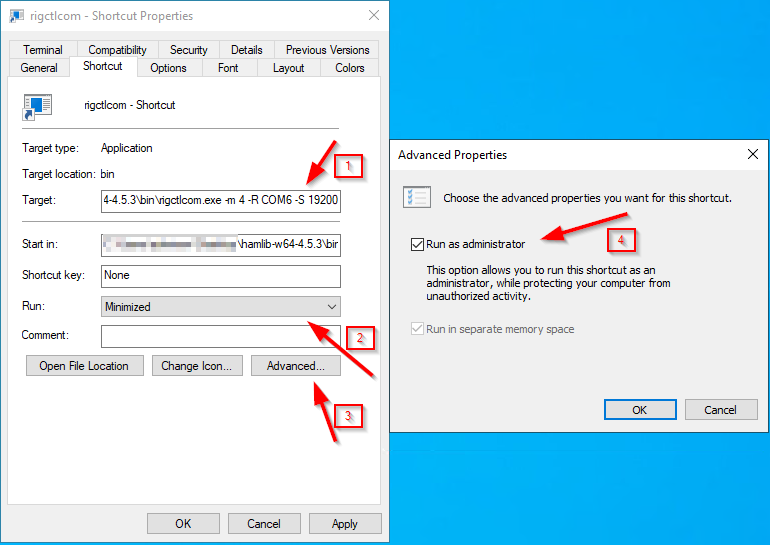
First, add " -m 4 -R COMx -S 19200" (whitespace is important!) behind whatever is in the "Target" input box. Replace COMx with the virtual COM port number you have NOT used in N1MM (for me, COM6).
Secondly: Change the "run" property to "minimized". Lastly, open advanced options and turn on "Run as administrator".
Leave everything else as is.
If you want, use "Change icon" to set a distinct icon.
Save everything and close properties.
Step 6: Done! Use it to your heart's content.
Hold on... done?
Yes. Done. Now I'll explain what we have created while we start our control chain.
1) Start flrig. Configure to your liking.
2) Doubleclick your new shortcut. After the admin prompt, you will have a new program in your taskbar, minimized. This will just sit there.
3) Start up N1MM. Watch as it clicks your radio and CAT control is working via flrig.
OK - what kind of magic is this?
Dark magic. I'm kidding, of course:
The new shortcut you created is a library of hamlib which connects to your local flrig (-m 4) and emulates a Kenwood TS-2000. It takes everything that flrig does and emulates the TS-2000 equivalent, as if there really was a TS-2000 present. This virtual TS-2000 is then connected to a COM port (-R COM6) using a baud rate of 19200 (-S 19200).
The virtual com port driver takes everything that happens on the "virtual TS-2000" and directs it to the other COM port of the virtual pair.
Then N1MM connects to this COM port and controls a virtual TS-2000.
This way, N1MM always sees the TS-2000, and you can happily change your flrig-config and physical radios without needing to tinker with N1MM. Happy days!
"Graphic" representation:
Flrig <-> Emulation magic <-> COM6 <-> com0com or alternatives <-> COM5 <-> N1MM
This is pretty bulletproof, I have run several contests with this setup without it failing.
After you are done, close N1MM, close the "emulation" program and lastly, close flrig.
Pretty neat, isn't it?
precooking flrig configs
Wait. And how do I create these flrig configs you talked about so I can switch radios easily?
That's a story for another post :)
EDIT 2023-02-05: Post is up: Click here
73 and good DX, de Stefan, DB4SCW.